How do I scan and upload mail?
What Device are you using?

Web Page
Note: There are two methods to scanning and uploading mail with the Web Page.
First Method
Use this method if you have already Uploaded an Image to the device you are using.
Second Method
This method is for uploading mail in bulk. This can save time when there is a high volume of incoming mail to be Scanned & Uploaded.
First Method
1.) Part One - Uploading previously scanned mail
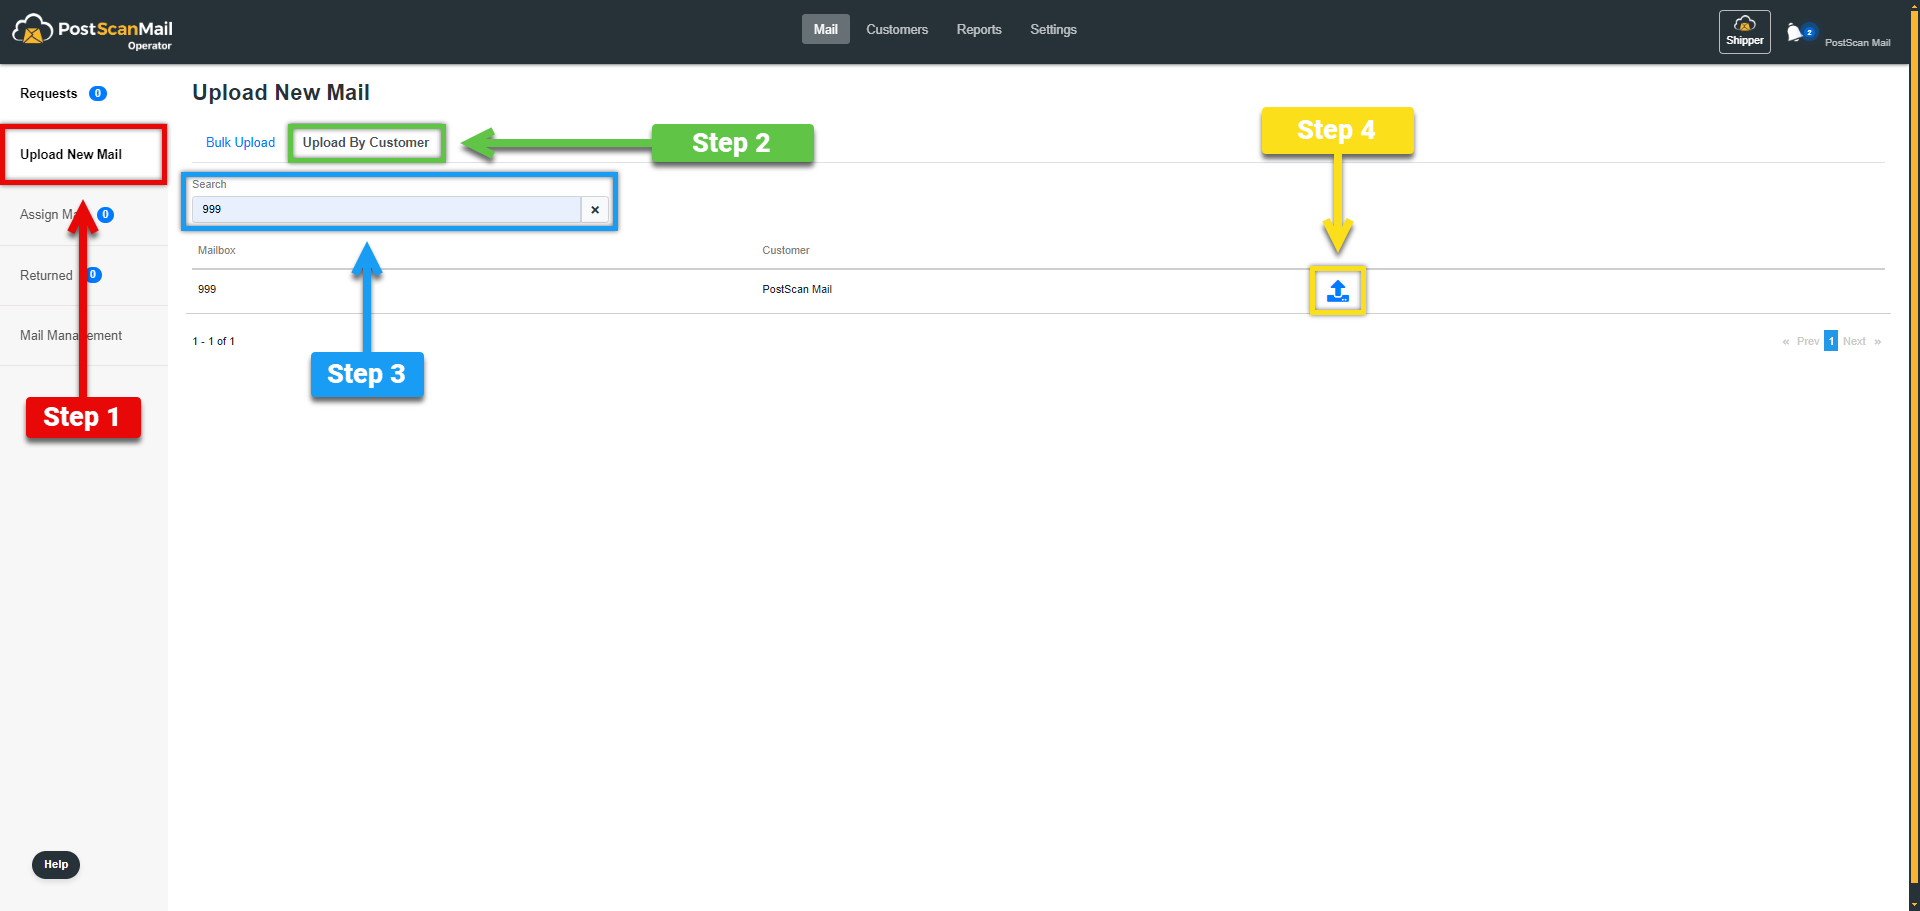
Note: For this example we will use PMB# 999.
1.) Select the Upload New Mail menu highlighted in RED.
2.) Select the Upload By Customer tab highlighted in GREEN.
3.) Enter the customer's PMB# in the Search field highlighted in BLUE.
4.) Select the Upload Mail icon highlighted in YELLOW.
2.) Part Two - Verifying and uploading
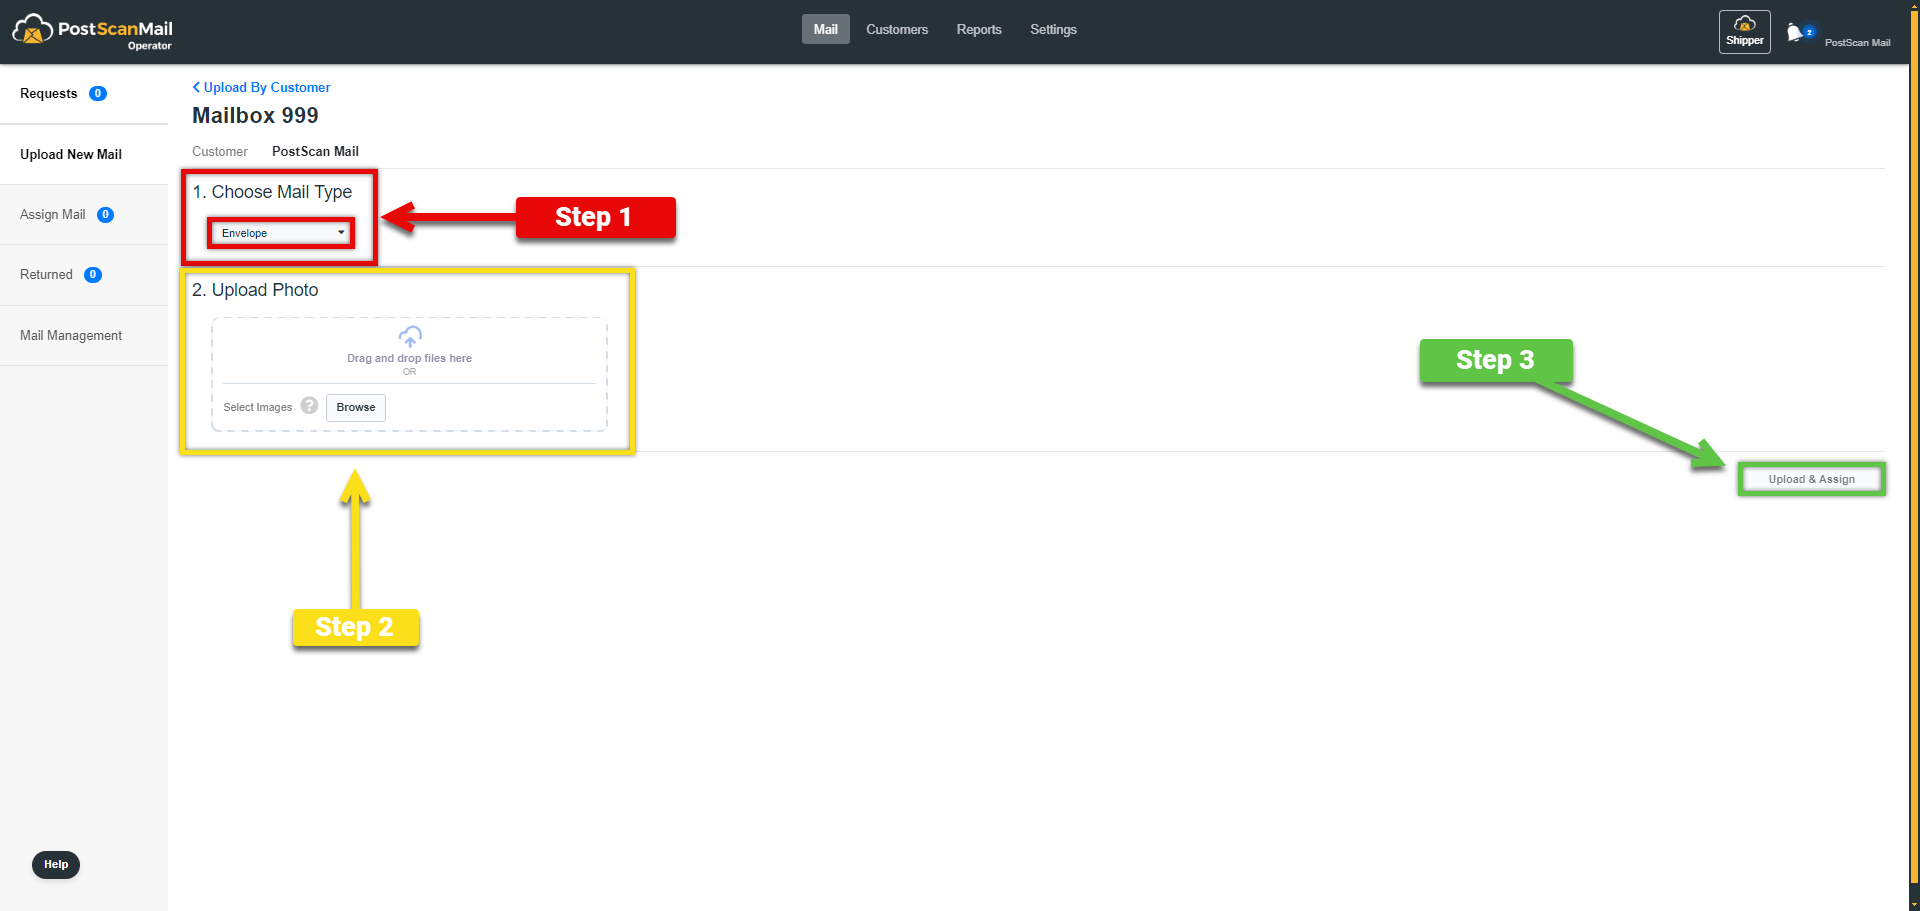
Note: Choosing the CORRECT MAIL TYPE is VERY IMPORTANT for making sure everything works correctly in the software.
We want to produce the correct shipping labels for you and make sure that the customer is charged correctly for shipping, storage, and any other associated fees.
1.) Select the Choose Mail Type button that is highlighted in RED, then select the correct Mail Type for the current item being uploaded.
2.) After selecting the correct mail type, upload the photo for the piece of mail. This section is highlighted in YELLOW. The file can be uploaded by browsing files within the computer or it can be dragged and dropped.
3.) Select the Upload & Assign button highlighted in GREEN to complete the process. This will send an automatic notification to the customer that they have new mail.
Note: If there are any questions about the Mail Types - Click Here.
An example of the process is shown in the video below.

Second Method
Uploading Bulk Mail
1.) Part One - Selecting the bulk upload

1.) Select the Mail tab at the top of screen, highlighted in RED.
2.) Select the Bulk Upload Tab towards the top of the screen, highlighted in YELLOW.
3.) Select the Upload New Mail menu to the left of the screen, highlighted in GREEN.
2.) Part Two - Uploading the mail in bulk
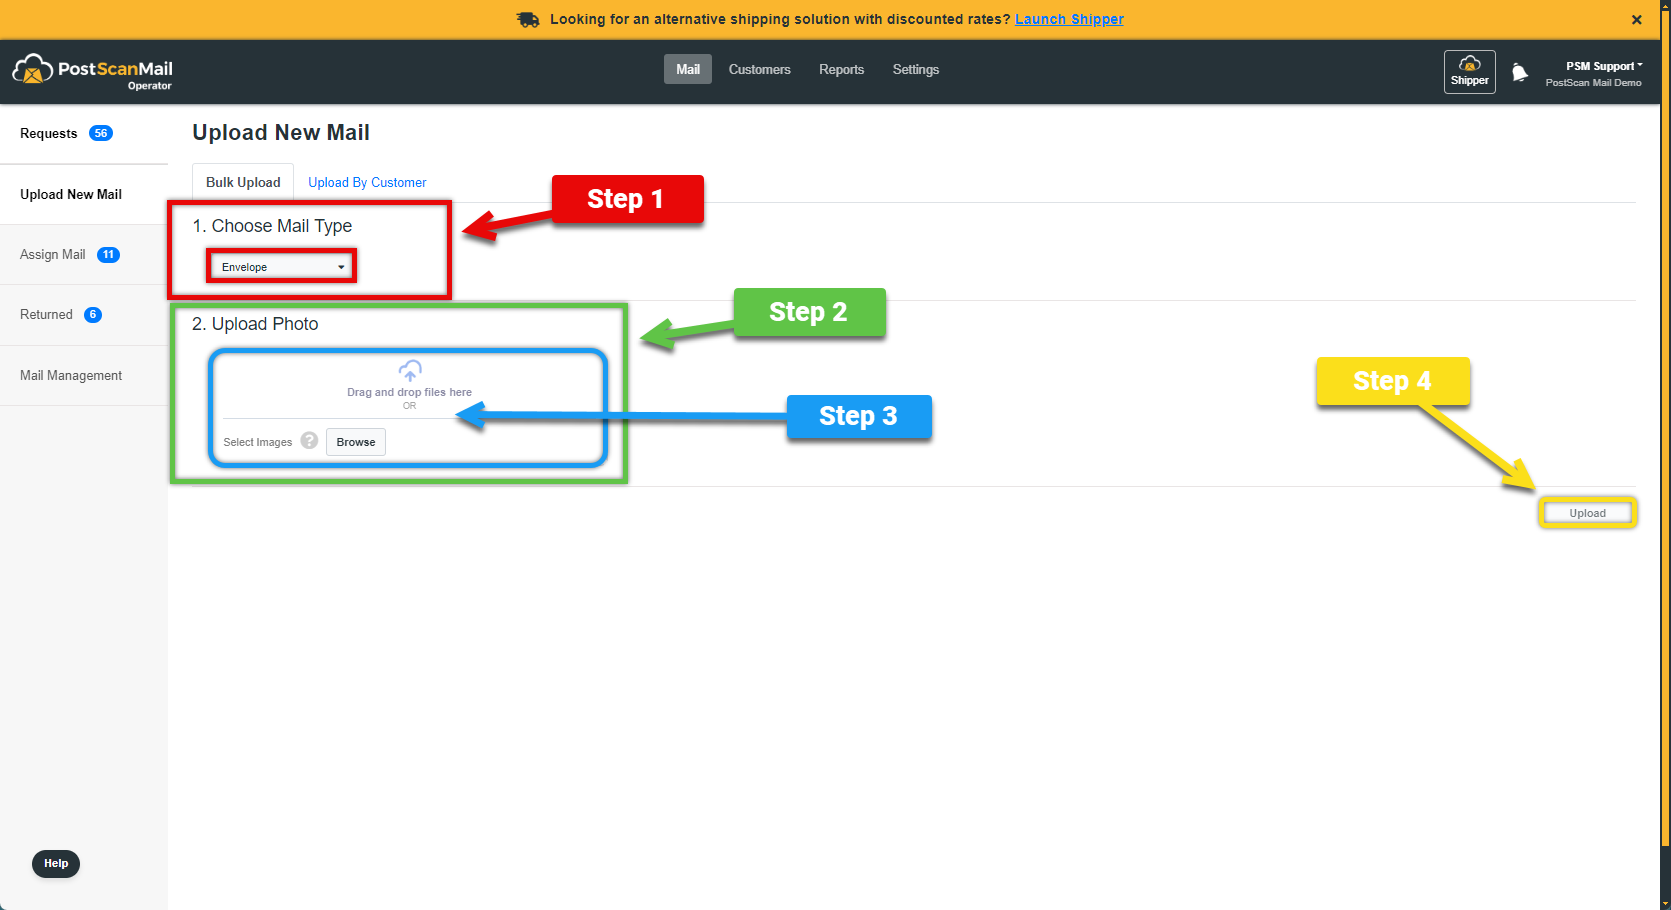
Note: Choosing the CORRECT MAIL TYPE is VERY IMPORTANT for making sure everything works correctly in the software.
We want to produce the correct shipping labels for you and make sure that the customer is charged correctly for shipping, storage, and any other associated fees.
1.) Select the Choose Mail Type button that is highlighted in RED, then select the correct Mail Type for the current item being uploaded.
2.) After selecting the correct mail type, upload the photo for the piece of mail. This section is highlighted in GREEN.
3.) The files can be uploaded by browsing files within the computer or it can be dragged and dropped. This drag and drop location is highlighted in BLUE
4.) Select the Upload & Assign button highlighted in YELLOW to complete the process. The mail will then need to be assigned to a customer.
To learn how to Assign Mail to a PMB# - Click here.
An example of the process is shown in the video below.

iOS Application
1.) Part One - Select the Navigation Menu, highlighted in RED

2.) Part Two - Scanning or uploading new mail

1.) Select the New Mail button, highlighted in RED.
2.) Select the Scan button to capture the image for new mail. If the mail is already captured select the upload image to upload it from the current device.
3.) Part Three - Breaking down theimage capture screen

1.) Highlighted in RED are the Flash settings. By default it is on auto, it can also be turned on or off.
2.) Highlighted in GREEN are the Image Color Settings. By default it is set to Color. It is best left on this setting for clear images in color.
3.) Highlighted in BLUE is the button to capture the image. This is used if the image capture settings are set to Manual.
4.) Highlighted in YELLOW are the image capture settings. By default it is set to Auto. This will automatically capture the image. If set to Manual the button highlighted in BLUE will need to be pressed to capture the image.
Note: Below is an example of the image capture area. Everything outside of the blue box will be cropped out of the image.

4.) Part Four - Finishing scanning mail

1.) All of the mail currently scanned will be shown at the bottom of the screen, highlighted in RED. You can tap on the the mail to view it in full size.
2.) Select the Save button, highlighted in GREEN when you are finished scanning mail.
5.) Part Five - What are these icons, buttons and menus?

1.) At the top of the screen you will find the Mail ID#. Towards the bottom of the screen, highlighted in RED you will find three icons.
- The Trash Can Icon on the left allows you to delete the image and recapture it.
- The Square Icon in the center allows you to adjust the cropping of the image.
- The Circular Arrow on the right allows you to Rotate the image.
2.) Select the Mail Type button, highlighted in GREEN to change the mail type if needed.
Once selected a drop box for each Mail Type will appear.
Note: Choosing the CORRECT MAIL TYPE is VERY IMPORTANT, for making sure everything works correctly in the software. We want to produce the correct shipping labels and make sure that the customer is charged the correct amount for shipping and any other associate fees.
If there are any questions about the different Mail Types. Click Here for an in-depth description.
3.) To change the sender, click the Sender button, which is highlighted in BLUE.
Once selected a drop menu will appear. If the customer has a previous sender it can be selected, if there is no previous sender a new one can be typed in.
4.) If you are finished scanning the mail, select the Upload button. If you wish to continue scanning mail select the Add More Items button. Both of these buttons are highlighted in YELLOW at the bottom of the screen.
6.) Part Six - Labeling the mail
Now the mail can be labeled with the PMB# and the Mail ID#

Note: This example is the recommended way to label mail.
1.) The PMB# is the top number, highlighted in RED.
2.) The Mail ID# number is the bottom BLUE.
7.) Part Seven - Mail Selection Confirmation Screen

1.) All the Mail, highlighted in RED, will be populated in this selection screen. Select all of the mail with the green check mark that you are trying to assign to a PMB#.
Note: All of the mail selected in this screen will be assigned to the SAME PMB#.
2.) If you wish to assign the mail now, select the NEXT button. If you want to assign the mail at a later time select the Assign Later button. Both of these buttons are highlighted in GREEN at the bottom of the screen.
6.) Part Six - Finding the Mailbox Number (PMB#) or Account Name

1.) To search for a customers account by the Mailbox Number (PMB#), select the Mailbox Number button, highlighted in RED.
2.) To search for a customers account by the Name, Select the Name button, highlighted in GREEN.
3.) Enter either the Mailbox Number (PMB#) or the Name of the customer depending on your selection in the search field highlighted in BLUE.
4.) Select the customer you are trying to assign mail to, highlighted in YELLOW.
7.) Part Seven - Final Confirmation Screen

1.) Highlighted in RED, is a confirmation of all the mail current being uploaded to the customer. Here the Mailbox #, Customer (User), How many items and all of their Mail ID#'s are shown.
Note: The Area ID is no longer used, it can be disregarded.
2.) Once all of the information is correctly entered in, click the Assign button. This is highlighted in GREEN. This will bring up a confirmation screen where you can click the Next button. The mail will now be assigned to the customer, they will receive an automatic notification that they have new mail to view.
Android Application
1.) Part One - Select the New Mail button, highlighted in RED

2.) Part Two - Breaking down the Image capture screen

1.) The Mail ID# Is located at the top of the screen, highlighted in RED.
2.) The Lightning Bolt Icon, highlighted in GREEN, will toggle the light on the current device.
3.) The BLUE Square is the Image capture area, This can be dragged out to cover the entire mail item. This is highlighted by the YELLOW ARROWS.
4.) In the section highlighted in BLUE there is the White circle (Image Capture button). You can set the image capture settings from Auto to Manual. The Picture Icon at the top left allows you to select an Image that is already saved to the device.
3.) Part Three - Labeling the mail
Now the mail can be labeled with the PMB# and the Mail ID#.
Note: This example is the recommended way to label mail.
1.) The PMB# is the top number, highlighted in RED.
2.) The Mail ID# number is the bottom BLUE.
4.) Part Four - Adjusting the image and saving it

1.) Select the Crop & Rotate button, highlighted in RED if you need to adjust the orientation of the photo or the Cropping.
2.) Select the Filter button, highlighted in GREEN to change the filter options of the photo.
3.) The photo can be retaken if needed by selecting the Retake button, or it can be deleted by selecting the Delete button. Both of these are highlighted in BLUE.
Note: If you do not need to edit the Cropping, Rotation or the Filter, Part Four and Five can be skipped.
5.) Part Five - Adjusting the cropping & rotation

1.) The BLUE CIRCLES highlighted in RED, can be used to drag the Cropping of the image so that it can cover the entire Mail Item area.
2.) The Automatic Crop button will Automatically Crop the Mail Item. The No Crop button will remove the cropping from the image and reset it to the original boarder. The Rotate button will allow you to rotate the image and adjust the Orientation. All of this is highlighted in GREEN.
3.) When everything is adjusted properly select the Apply button to continue, highlighted in BLUE.
6.) Part Six - Selecting the color options

1.) Within the box highlighted in RED are the color options.
2.) If you choose to change the color options select the Apply button, highlighted in GREEN to continue.
Note: The Mail ID# will pop up at the top of the screen again.
7.) Part Seven - Selecting the mail type and sender

1.) The Mail ID# is located at the top of the screen, highlighted in YELLOW.
2.) The image can still be Deleted, Cropped, Rotated if needed. This is highlighted in GREEN.
3.) Within the box highlighted in BLUE, is where the Mail Type, Weight & Dimensions (For Packages and Large Envelopes are located). The Sender is also chosen here, If the Image capturing software did not automatically select the Mailbox # (PMB) or the Sender, these can be adjusted here.
4.) Select the + New Item button to continue uploading mail. Select the Assign button to continue to assign the mail. These are highlighted in RED.
8.) Part Eight - Selecting which mail items to assign

1.) Within the box highlighted in RED, are all the Mail Items that were scanned. Select the Select all button at the top right to check all of the Mail Items at once. You can also select each Mail Item individually by selecting the check boxes. These are also highlighted in RED with the INNER RED BOX.
2.) Select the Assign Later button to assign the Mail Items later. Select the + New Item button to continue uploading mail. Tap on the Next button to continue to the next part. These are all highlighted in GREEN.
9.) Part Nine - Assigning the mail to a mailbox number (PMB#)

1.) In the box highlighted in RED is the search bar. You can use this to find a Mailbox Renter (Customer) by either their Name or the Mailbox Number. Type this into the search bar. For this example we used the PMB#.
2.) Locate the customer who you are Assigning the mail to and tap on their name. This is highlighted in GREEN.
10.) Part Ten - Mail assignment confirmation screen

1.) Within the box highlighted in RED you can see all of the Mail Items that will be assigned.
Note: These will all be assigned to the SAME Mailbox Number.
2.) When everything looks correct, select the Assign button, highlighted in GREEN to assign the mail.