How do I process a pickup request?
What Device are you using?

Web Page
There are two types of Pickup requests. One is from the customer stating that they have already received the mail items listed. The second is setting an appointment to pick up the mail items listed.
Pick up request with an appointment
1) Selecting the mail item
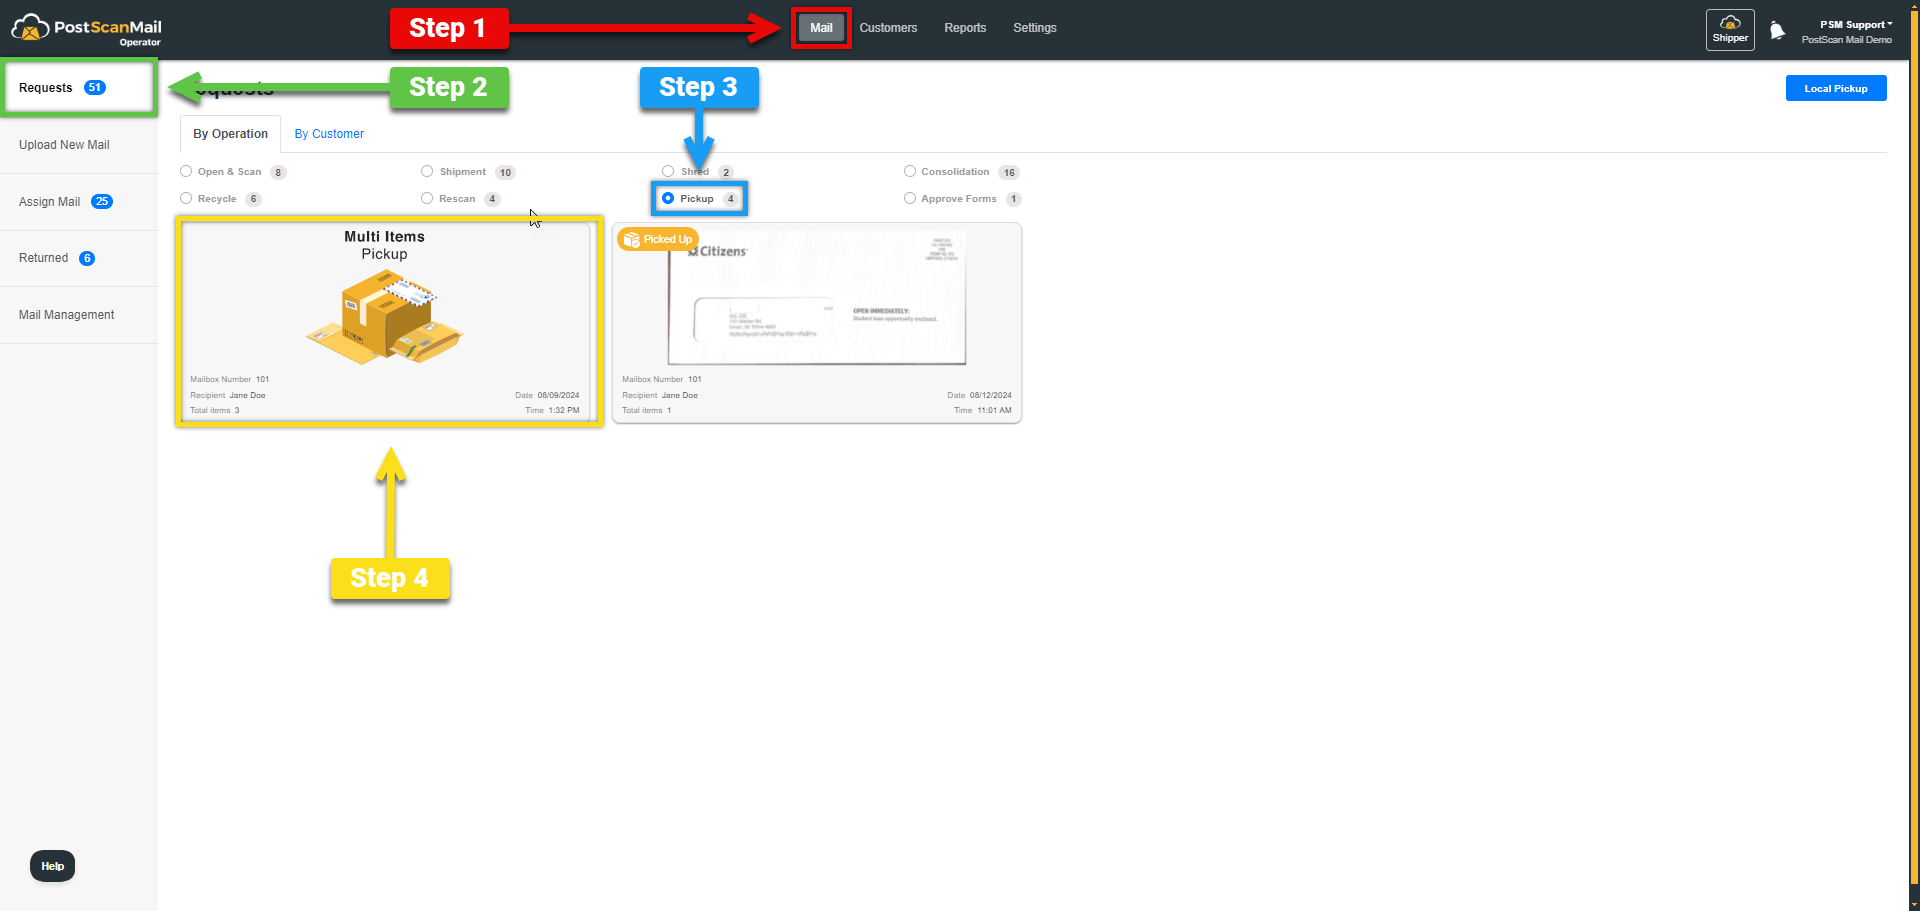
1.) Select the Mail tab at the top of the screen, highlighted in RED.
2.) Select the Requests button to the left of the screen, highlighted in GREEN.
3.) Select the Pickup button, highlighted in BLUE.
4.) Select the Mail item that is being picked up, highlighted in YELLOW.
Note: It will not have the "Picked up" box in the top left corner.
2) Confirming Mail For Pickup

1.) Inside the box highlighted in RED, you'll find all mail items requested for pickup, displayed with their image and Mail ID#. To confirm each item, click the checkboxes at the top left of each item, visible in the Inner RED Box.
2.) Inside of the box highlighted in GREEN, you will find the total number of Mail Items for pickup, the Mailbox Number (PMB #) and the current date/time. At the top right you can also click Confirm All.
3.) In the box highlighted in BLUE, you will find the Pickup Appointment time and date, Any comments from the customer.
4.) In the box highlighted in YELLOW, you will find the Picked up by section and the Cancel or Confirm buttons. The Picked up by must be filled out, it is best to ask for ID to make sure that the correct person is picking up the mail items. Select Confirm to complete the pickup request.

Pick up Request - Customer Already Received Mail Items
1) selecting the mail item
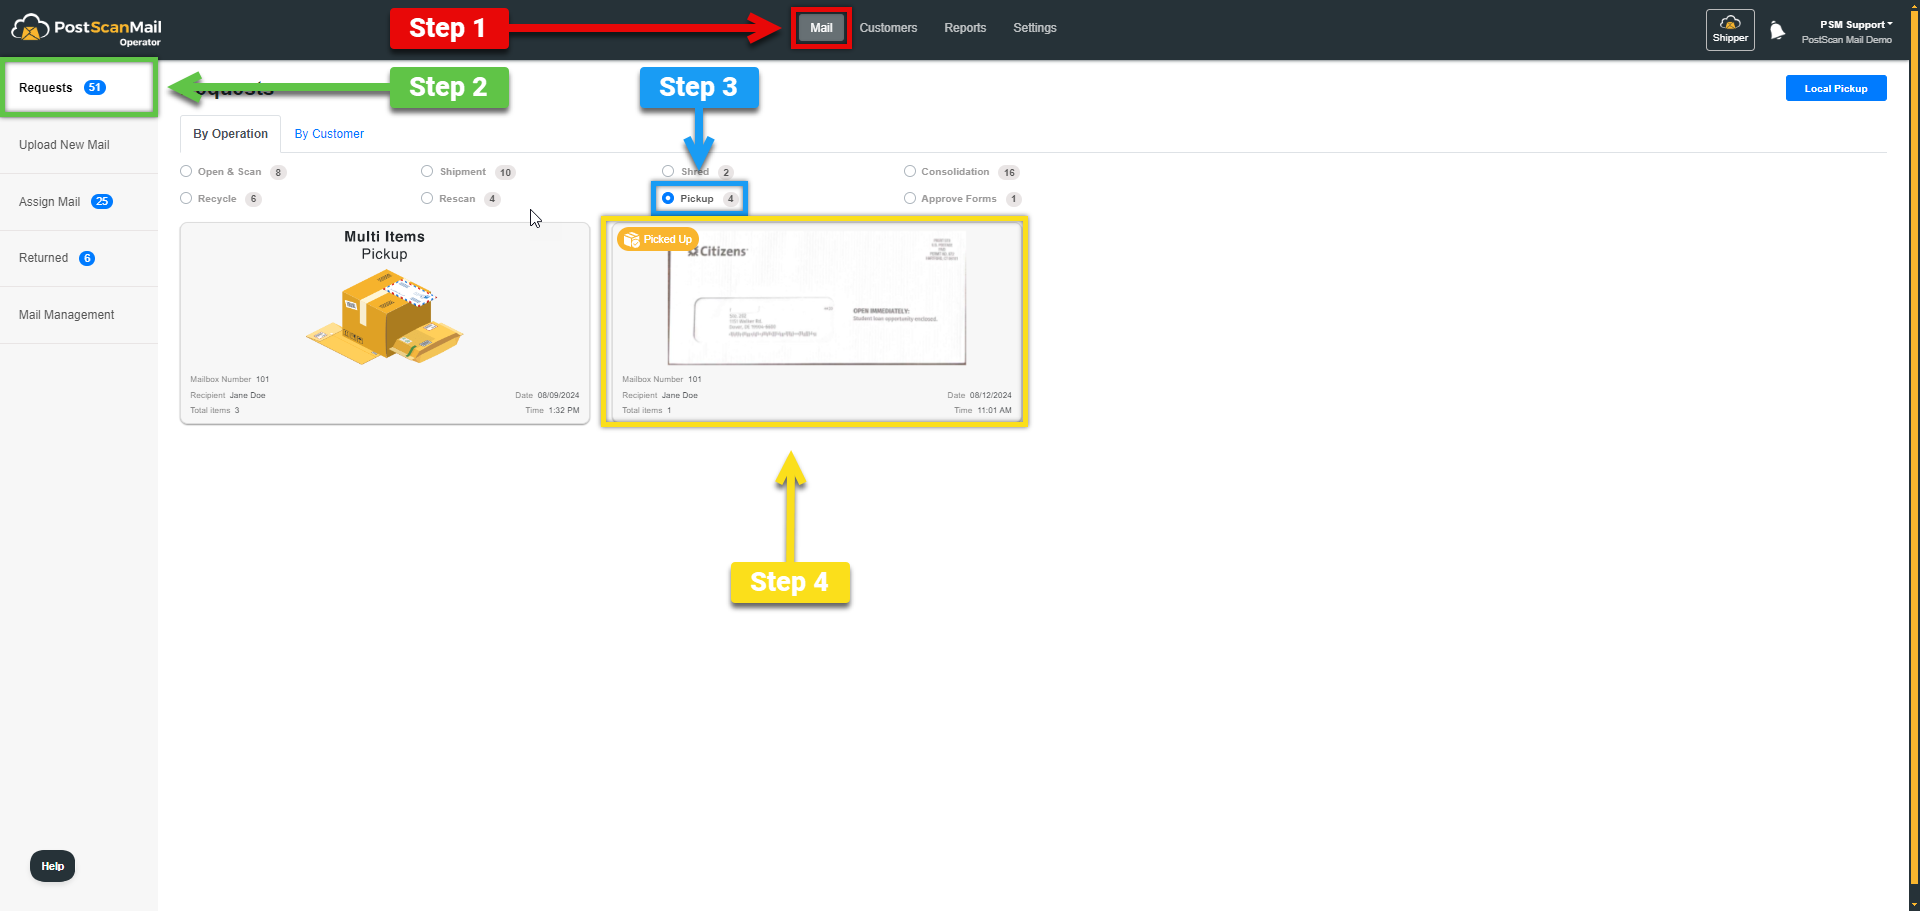
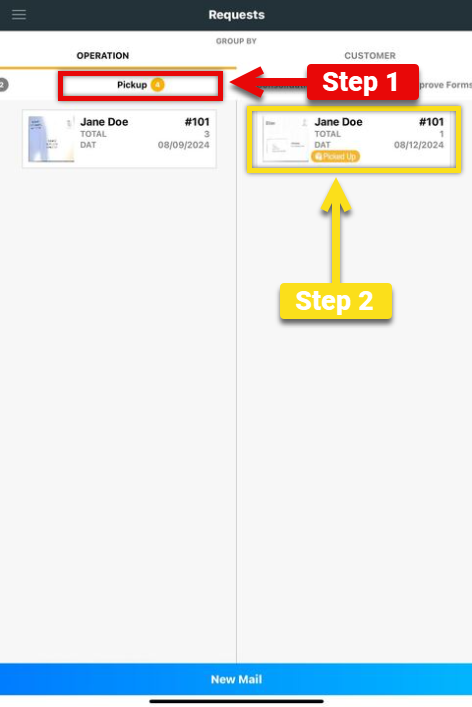
1.) Select the Mail tab at the top of the screen, highlighted in RED.
2.) Select the Requests button to the left of the screen, highlighted in GREEN.
3.) Select the Pickup button, highlighted in BLUE.
4.) Select the Mail item that is being picked up, highlighted in YELLOW.
Note: It will have the "Picked up" box in the top left corner.
2) Reviewing and Confirming the pickup request
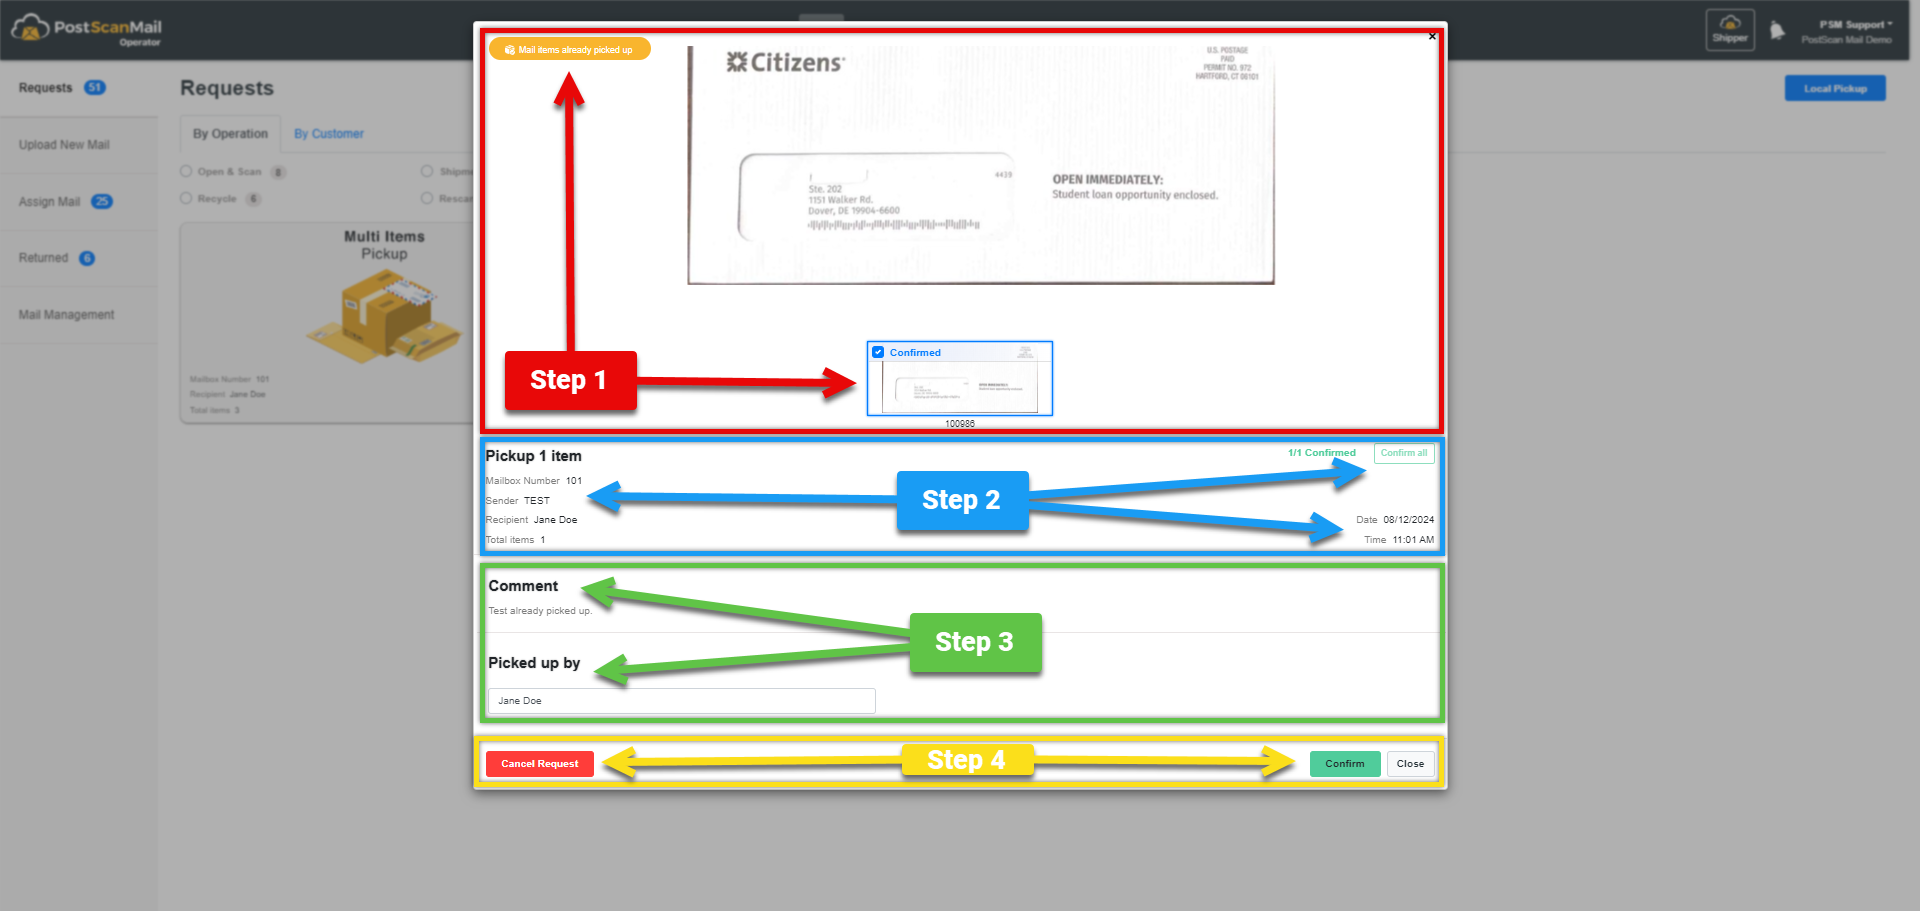
1.) In the box highlighted in RED, you'll see mail items already picked up, located at the top left of the screen. This indicates that the customer has received these mail items and is requesting their removal from the system. An image of the mail item and the Mail ID# are also provided.
2.) In the box highlighted in BLUE, you'll see the Mailbox number, total number of mail items, Recipient and the confirm all button.
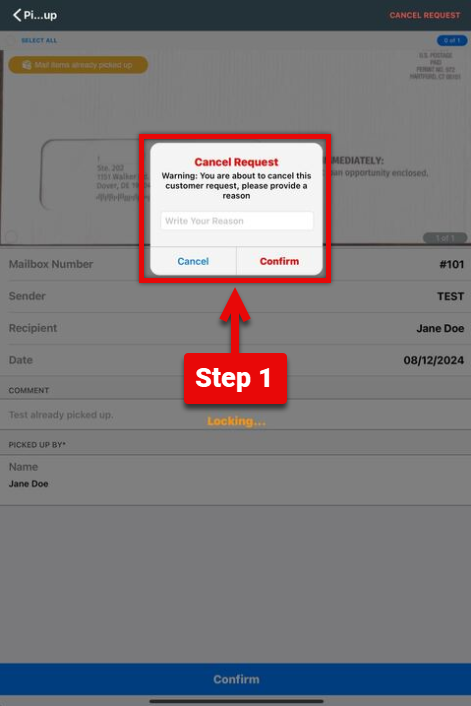
3.) In the box highlighted in GREEN, you'll find the Comment area and picked up by field. The comment is a comment left by the customer. The Picked up by field will need to be filled out before confirming.
4.) In the box highlighted in YELLOW, you will find the cancel request button and the confirm button. Select the Confirm button to acknowledge that these mail items have been picked up. If the customer may have made a mistake select the Cancel Request button.
3) Canceling The Customer Request
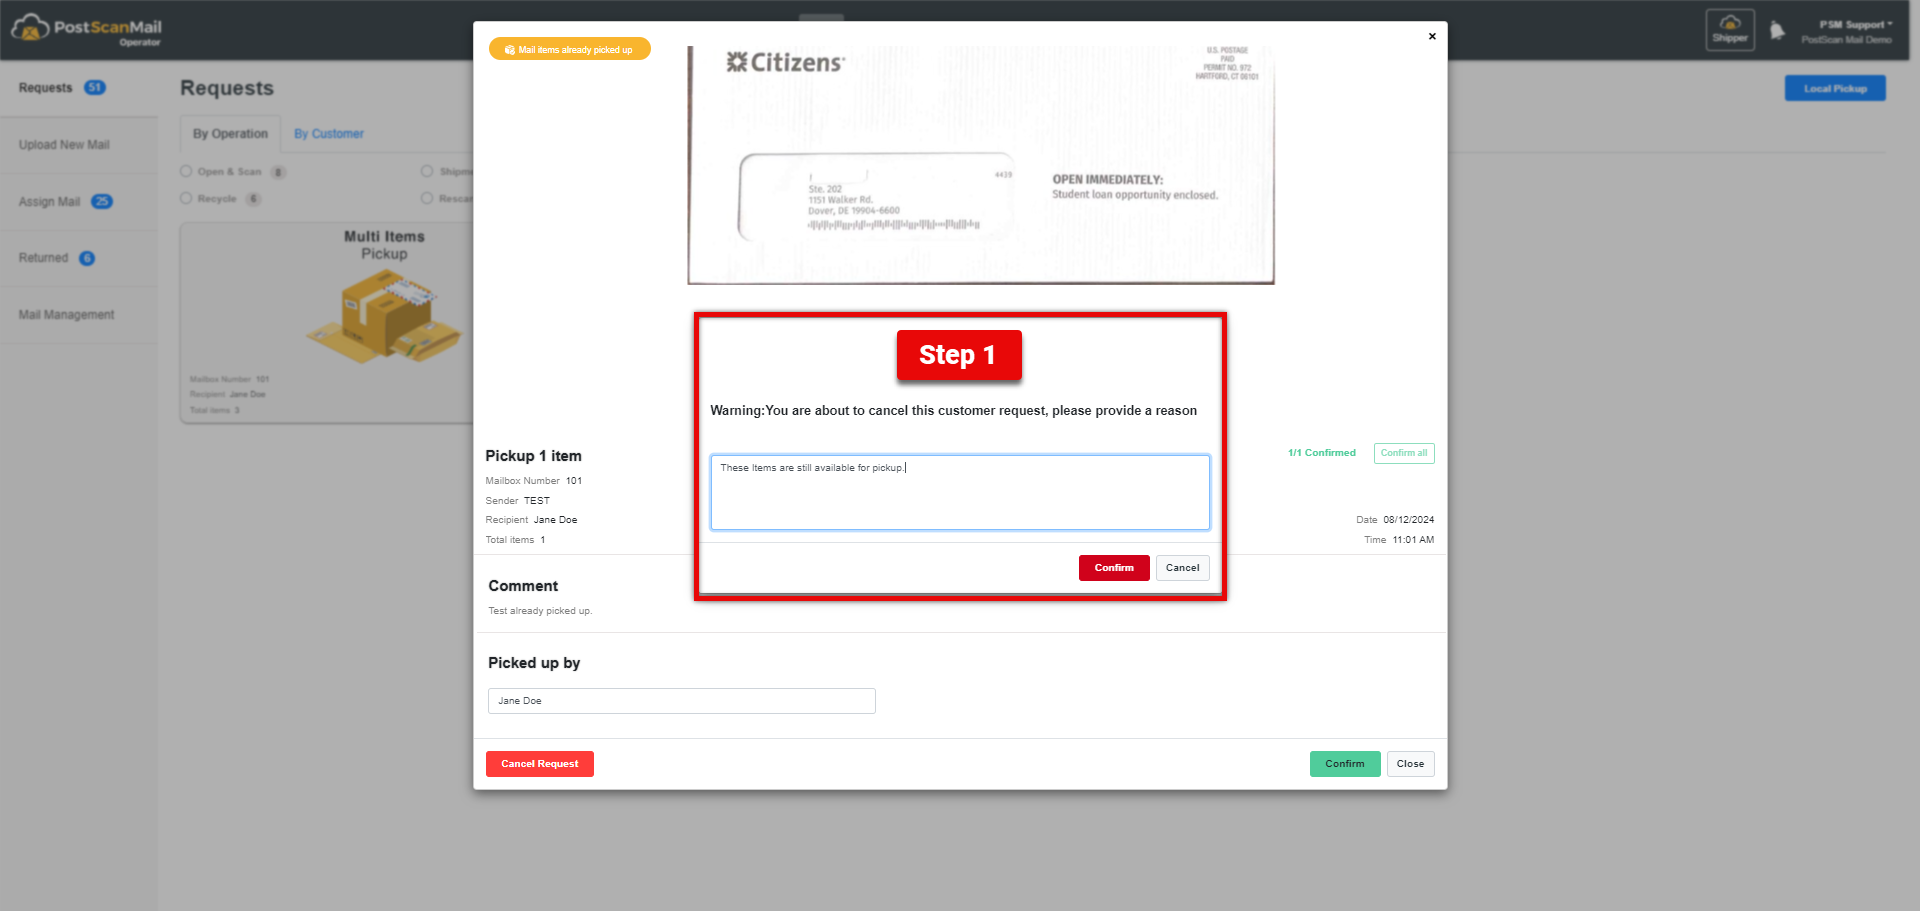
1.) If you have selected the Cancel Request Button, a box that will allow you to type to reason will be shown, highlighted in RED. This message will be sent to the customer, a good default message would be "These items are still available for pickup."
iOS Application
There are two types of Pickup requests. One is from the customer stating that they have already received the mail items listed. The second is setting an appointment to pick up the mail items listed.
Pick up request with an appointment.
1) Select the Navigation Menu Highlighted in RED
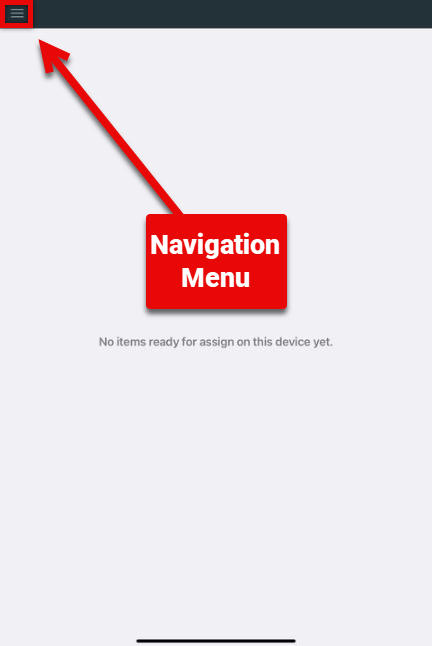
2) Select the Requests button, highlighted in RED
3) Selecting the Mail Item for pickup
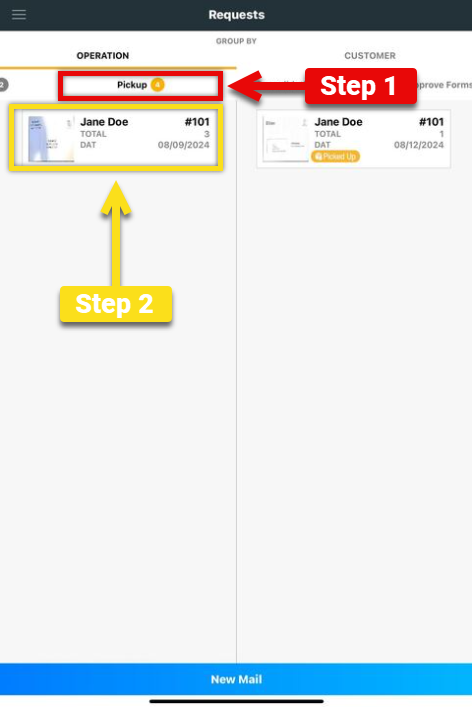
1.) Select Pickup, highlighted in RED.
2.) Select the Mail item that is being picked up, highlighted in YELLOW.
Note: It will not have the "Picked up" box in the top left corner.
4) Reviewing and Confirming the pickup request
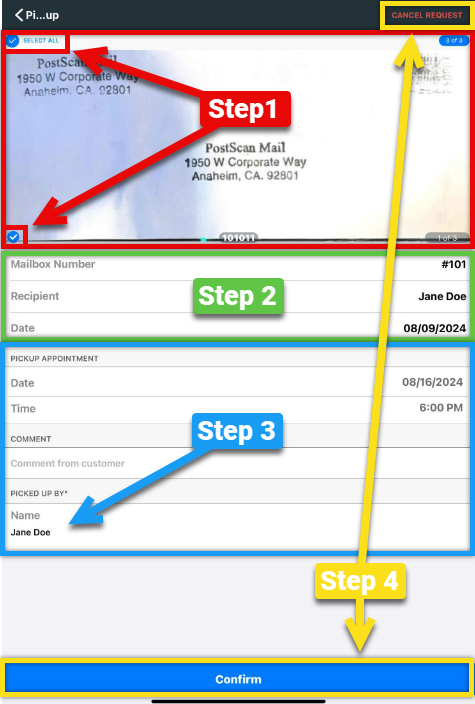
1.) In the box highlighted in RED, an image of the Mail item and the Mail ID# are displayed. At the bottom left the mail items will need to be confirmed, this can be seen with the blue check mark. At the top left is the Select All button to confirm all current mail items. To see additional mail items swipe the screen to the left.
2.) In the box highlighted in GREEN, you'll see the Mailbox number, Recipients, Date the mail item was uploaded.
3.) In the box highlighted in BLUE, you will find the Pickup Appointment Date and Time, Comments left by the customer and the Picked Up By Field.
Note: The Picked Up By field needs to be filled out before completing the pickup request.
4.) In the boxes highlighted in YELLOW, you will find the Cancel Request button and the Confirm button. Select the Confirm button to complete the pickup request.
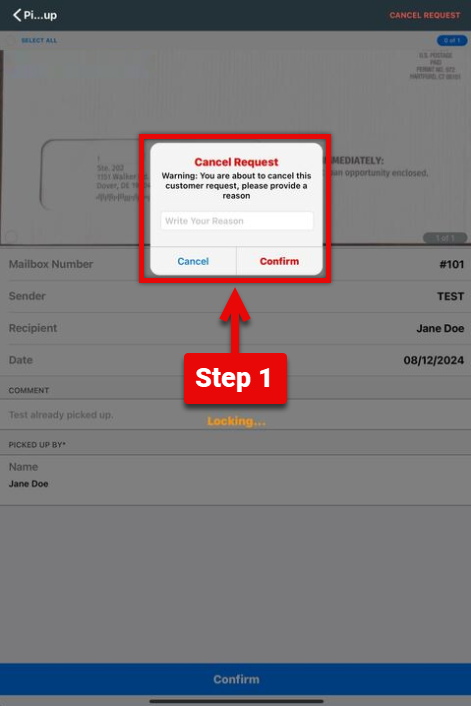
1.) If you have selected the Cancel Request Button, a box that will allow you to type to reason will be shown, highlighted in RED. This message will be sent to the customer, a good default message would be "These items are not available for pickup."
Customer Already Received Mail Items
1) Select the Navigation Menu Highlighted in RED
2) Select the Requests button, highlighted in RED

3) Selecting the Mail Item for pickup
1.) Select Pickup, highlighted in RED.
2.) Select the Mail item that is being picked up, highlighted in YELLOW.
Note: It will have a "Picked up" box on the image of the mail item.
4) Reviewing and Confirming the pickup request

1.) In the box highlighted in RED, an image of the Mail item and the Mail ID# are displayed. At the Top Left you will see the Mail Items Already Picked Up box. These are mail items that the customer is claiming to have already received.
2.) In the box highlighted in GREEN, you'll see the Cancel Request button. This is used if the customer has possibly made a mistake on selecting items that were already picked up.
3.) In the box highlighted in BLUE, you will find the Mailbox Number, Sender, Pickup Appointment Date and Time, Comments left by the customer and the Picked Up By Field.
Note: The Picked Up By field needs to be filled out before completing the pickup request.
4.) In the box highlighted in YELLOW, you will find the Confirm button. Select this to complete the pickup request.
1.) If you have selected the Cancel Request Button, a box that will allow you to type to reason will be shown, highlighted in RED. This message will be sent to the customer, a good default message would be "These items are still available for pickup."
Android Application
Pick up request with an appointment.
1.) Selecting the Pickup Request and the Mail Item
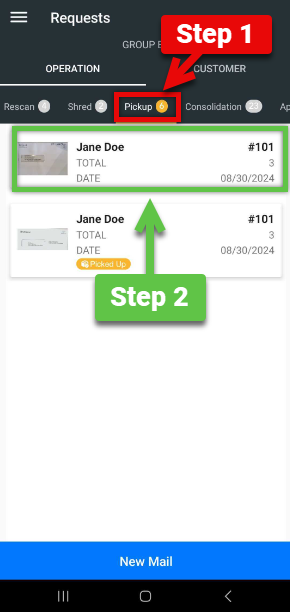
1.) Select the Pickup tab, highlighted in RED.
2.) Select the Mail item that is being requested for pickup. This is highlighted in GREEN.
Note: It WILL NOT have the yellow "Picked up" box in the bottom left corner.
2) Reviewing and Accepting or Canceling the Pickup Request
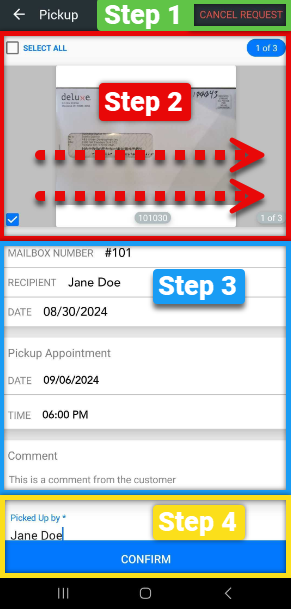
1.) At the top of the screen highlighted in GREEN, is the Cancel Request button. This is used if the Mail Items may have been already picked up, or some other reason. When this is selected a Cancel Request will be shown, a reason for the request can be entered in. An example of this screen will be showed below the following steps.
Note: This message goes directly to the customer, a good example message would be, "These Items have already been picked up."
2.) Confirm each Mail Item by selecting the box at the bottom left, or by selecting the Select All button at the top left. If you want to view the next Mail Item, you can swipe the screen to the right or left, this is indicated by the Dotted Line Arrows, highlighted in RED. All of this information is also highlighted within the RED box.
3.) Within the box highlighted in BLUE are the following. Mail Box #, Recipients Name, Date of the request, Pick up Appointment Date and Time and the Comment Section from the Mailbox Renter.
4.) In the box highlighted in YELLOW, is the Picked Up By section and the Confirm button. The picked up by section must be filled out to complete this process. Once everything looks correct and entered in, select the Confirm Button to complete this process.
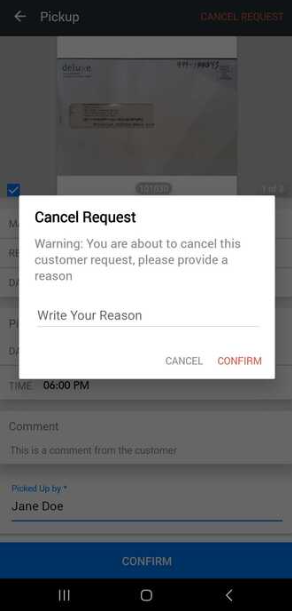
Note: Here is the Cancel Request Screen, remember that this message goes directly to the Mailbox Renter (Customer).
Pick up request with an appointment.
1) Selecting the Pickup Request and the Mail Item
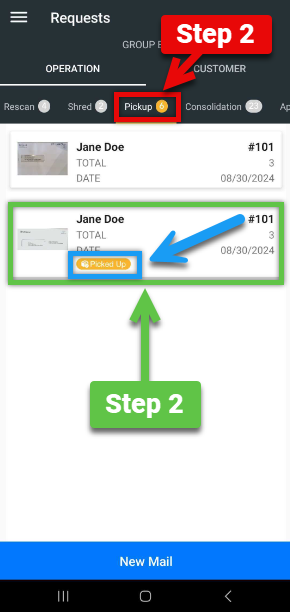
1.) Select the Pickup tab, highlighted in RED.
2.) Select the Mail item that is being requested for pickup. This is highlighted in GREEN.
Note: It WILL have the yellow "Picked up" box in the bottom left corner. This is highlighted by the BLUE BOX and BLUE ARROW.
2) Reviewing and Accepting or Canceling the Pickup Request
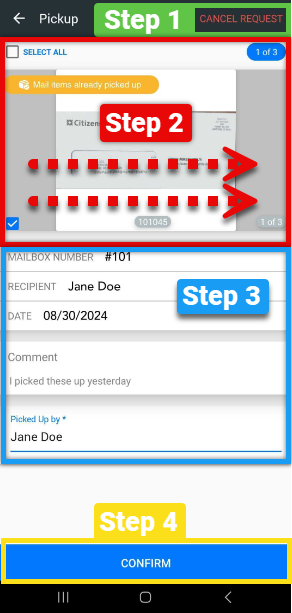
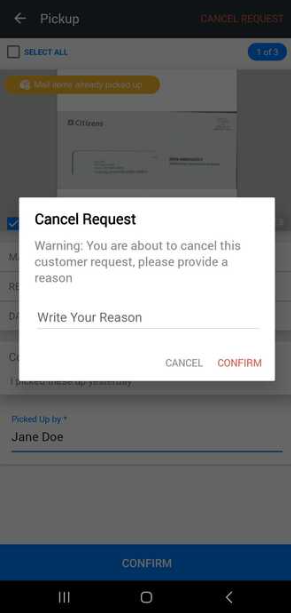
1.) At the top of the screen highlighted in GREEN, is the Cancel Request button. This is used if the Mail Items may have been already picked up, or some other reason. When this is selected a Cancel Request will be shown, a reason for the request can be entered in. An example of this screen will be showed below the following steps.
Note: This message goes directly to the customer, a good example message would be, "These Items have already been picked up."
2.) Confirm each Mail Item by selecting the box at the bottom left, or by selecting the Select All button at the top left. If you want to view the next Mail Item, you can swipe the screen to the right or left, this is indicated by the Dotted Line Arrows, highlighted in RED. All of this information is also highlighted within the RED box.
3.) Within the box highlighted in BLUE are the following. Mail Box #, Recipients Name, Date of the request, Pick up Appointment Date and Time and the Comment Section from the Mailbox Renter.
4.) In the box highlighted in YELLOW, is the Picked Up By section and the Confirm button. The picked up by section must be filled out to complete this process. Once everything looks correct and entered in, select the Confirm Button to complete this process.
Note: Here is the Cancel Request Screen, remember that this message goes directly to the Mailbox Renter (Customer).